Tag Archives: utility

ArcGIS栅格向Surfer Grid的格式转化 (Convert ArcGIS raster to Surfer GIS)

Zhuotong Nan ([email protected])

以下简单的代码实现了ArcGIS支持的栅格向Golden software的Surfer ASCII grid的格式转化。需要注意的是,ArcGIS的栅格左上为坐标原点,向下向右为正。而Surfer grid是左下是坐标原点,向上向右为正。

Here I will show a class that implements the major functionality to convert any Raster file supported by ArcGIS to Surfer ASCII grid format. The resulting Surfer grid can be read by Surfer with version 6 or higher. One point we need to keep in mind, ArcGIS raster stores data in row-major order, right and downwards being positive, while Surfer grid takes lower left corner as the original, right and upwards being positive.

using System;
using System.Collections.Generic;
using System.Text;
using System.IO;
using ESRI.ArcGIS.Geodatabase;
using ESRI.ArcGIS.DataSourcesRaster;
using ESRI.ArcGIS.esriSystem;
using ESRI.ArcGIS.Geometry;

namespace RasterToSurferGrid
{
/// <summary>
/// A wrapper class for Surfer ASCII grid file
/// </summary>
class SurferGrid
{
string id = “DSAA”;
int nx;//columns
int ny; //rows
double xlo; //the minimum X value of the grid
double xhi; //xhi is the maximum X value of the grid
double ylo;
double yhi;
double zlo;
double zhi;
List<double> data; //the grid is stored in row-major order, with the lowest row (minimum Y) first

public SurferGrid(string rasterPath)
{
data = new List<double>(nx * ny);

IWorkspaceFactory wf = new RasterWorkspaceFactoryClass();
IRasterWorkspace wk=(IRasterWorkspace)wf.OpenFromFile(System.IO.Path.GetDirectoryName(rasterPath), 0);
IRasterDataset ird = wk.OpenRasterDataset(System.IO.Path.GetFileName(rasterPath));
IRaster raster=ird.CreateDefaultRaster();

IRasterProps props = (IRasterProps)raster;
nx = props.Width;
ny = props.Height;
IEnvelope env = props.Extent;
xlo = env.XMin;
xhi = env.XMax;
ylo = env.YMin;
yhi = env.YMax;
//zlo = env.ZMin;
//zhi = env.ZMax;

//populate data
PntClass extent=new PntClass();
extent.X=nx;
extent.Y=ny;
IPixelBlock datablock=raster.CreatePixelBlock(extent);
PntClass orig = new PntClass();
orig.X = 0;
orig.Y = 0;
raster.Read(orig, datablock);

for (int y = ny – 1; y >= 0; y–)
//for (int x = 0; x < nx; x++)
{
for (int x = 0; x < nx; x++)
{
data.Add((float)datablock.GetVal(0,x,y));
}
}

//get the max, and min
double max, min;
max = data[0]; min = data[0];
for (int i = 0; i < data.Count; i++)
{
max = max > data[i] ? max : data[i];
min = min < data[i] ? min : data[i];
}

zlo = min;
zhi = max;
}

public void WriteToFile(string outPath)
{
//StringWriter sw = new StringWriter();
StreamWriter sw = new StreamWriter(outPath);
sw.WriteLine(id);
sw.WriteLine(“{0} {1}”, nx, ny);
sw.WriteLine(“{0} {1}”, xlo, xhi);
sw.WriteLine(“{0} {1}”, ylo, yhi);
sw.WriteLine(“{0} {1}”, zlo, zhi);
StringBuilder sb=new StringBuilder();
for (int i = 0; i < ny; i++)
{
for (int j = 0; j < nx; j++)
{
sb.AppendFormat(“{0} “, data[i*nx+j]);
}
sb.Remove(sb.Length – 1, 1);
sb.AppendLine();

}
sw.Write(sb.ToString());
sw.Close();
}

}

}

附件是源代码。工具的运行需要dotnet framework 2.0和ArcView以上的License运行。编译后在命令行敲入RasterToSurferGrid有使用提示。

The attached please find necessary source codes which can be compiled on your own platform. Dotnet framework 2.0 and a valid ArcView license or higher are both required to run this tool. Besides, ArcGIS assemblies for dotnet framework are required. After successful compilation, typing RasterToSurferGrid following the command prompt shows you its usage information.
RasterToSurferGrid.zip
读取网站的Alexa排名/Get Alexa ranking data for your site

南卓铜(Zhuotong Nan, [email protected])

由于网站自己设置的网站访问数有时不真实,为了比较网站的访问量,我们一般使用权威的第三方网站来比较访问量。Alexa网站提供被大家认可的排名数据。比如,访问http://www.alexa.com/data/details/traffic_details/westdc.westgis.ac.cn,可以看到“西部数据中心”目前排名访问。

Alexa提供了收费的Web service允许大家使用其数据,大概是每1000次请求0.15美金(见这里)。收费并不高,而且包括众多的功能。

然而作为程序员,有时候宁愿挑战一下自己的能力。比如有没有一种免费而且合法的手段来获取它的排名数据,比如Westdc.westgis.ac.cn目前排名1,080,823里的这个名次(May 06 2008)。

Alexa为了挣钱,使用了一些方法来防止简单的页面数据获取。比如我们看排名的HTML片断:

<span class=”descBold”> &nbsp;<!–Did you know? Alexa offers this data programmatically.  Visit http://aws.amazon.com/awis for more information about the Alexa Web Information Service.–><span class=”c669″>1,</span><span class=”cbf1″>34</span>0<span class=”cd05″>80</span><span class=”c9d1″>,8</span><span class=”c2e8″>23</span></span>

直接从Web页面拷贝的结果是1,34080,823,而不是正确的1,080,823。这是因为Alexa增加了一些<span>标签来混淆HTML代码,这些<span>的CSS被设置成display:none,所以在浏览器里显示却是正确的。而且这些混淆的<span>标签是随机任何组合的。

解决方案可以从模拟浏览器显示出发,逐步剥离没用的信息,最终获取排名数字。

a. 获取整个HTML源代码;分析获取源代码中有关排名的HTML片断;
b. 下载干扰的CSS表,取得display属性为none的全部css类名;
c. 利用css类名列表,从HTML片断中移去对应的<span>标签和标签内的数字;
d. 移去剩余的HTML标签;
e. 转成数值输出。

以下代码演示了此方法,使用了c# 2.0,在Visual Studio 2005编译运行通过。代码里使用了正则表达式。

/* Purpose: to get Alexa ranking data by using c#
* Author: Zhuotong Nan ([email protected])
* Date: May 06 2008
*/
using System;
using System.Collections.Generic;
using System.Text;
using System.Text.RegularExpressions;

namespace wml.stat
{
class AlexaRanking
{
public static int Rank(string url)
{
int ret = -1;

Uri uri = new Uri(url);
string newUrl = “http://www.alexa.com/data/details/traffic_details/” + uri.Host;
System.Net.WebClient wc = new System.Net.WebClient();
string html=wc.DownloadString(newUrl);

//pattern for obtaining html codes in relation to ranking data
string htmlpattern = @” about the Alexa Web Information Service.–>(.+?)</span><!–“;
string snipet = Regex.Match(html, htmlpattern).Groups[1].Value;

//get css file which store css classes preventing from scrambling
string cssUrl = “http://client.alexa.com/common/css/scramble.css”;
string cssfile = wc.DownloadString(cssUrl);

//css class pattern for getting CSS class listing with no display to the browse
string cssclassPattern=@”.(.*?) {“;
MatchCollection cssmc = Regex.Matches(cssfile, cssclassPattern);
//css classes without display, forming reg patterns
List<string> css_nodisp_patterns = new List<string>();
foreach (Match m in cssmc)
{
css_nodisp_patterns.Add( “<span class=”” + m.Groups[1].Value
+””>.*?</span>”);
}
//remove those classes from html snippet
foreach (string p in css_nodisp_patterns)
{
snipet=Regex.Replace(snipet, p, “”);
}

//see html snippet left
//remove span tags
string tagPattern = “<[^>]*>”;
snipet=Regex.Replace(snipet, tagPattern, “”);

ret = Int32.Parse(snipet, System.Globalization.NumberStyles.AllowThousands);
return ret;
}

static void Main(string[] args)
{
AlexaRanking.Rank(“http://westdc.westgis.ac.cn”);
}
}
}

本文独立实现,但后来google发现有人利用了差不多的方法,只不过在实现上用了PHP,最终产生的结果稍有不同,见 http://plice.net/?p=10

Kappa tool

Zhuotong Nan (南卓铜,[email protected])

网上可以找到的计算Kappa系数的工具都是基于ArcView 3.x,如KappaStat。大多是做Land cover classification的人开发的。计算对象是采样的点文件和分类的polygon或者grid文件。但如果我们将Kappa应用于两个图像比较它们的相似性时,这类软件不能直接用。一个可行的方法是,将其中一个图像转换成point文件,比如应用arcgis的RasterToPoint命令。但对于很多图像对要比较,则没有好用的法子。KappaStat的图形界面和本身是一个ArcView 3.x的扩展模块,决定了即使写Avenue脚本也不是件容易实现的事。

所以我们写了一个小工具Kappa.exe。它用来计算两个栅格文件之间的Kappa系数,只要两个栅格文件有同样的width和height(即两图像是同样的mxn阵列)。Kappa工具不考虑栅格文件所在的空间参考系,只是简单的逐网格进行运算。用户需要自己确认两幅图像有合适的空间参考系。

Kappa工具与KappaStat进行了结果验证,证明计算是可靠,输出结果包括误差矩阵(Error Matrix),Kappa系数,还包括Variance和P统计值。

Kappa工具对栅格图像的支持调用了ArcGIS ArcObjects栅格API,支持很多种栅格格式,包括ESRI grid, ASCII grid, TIFF/GeoTIFF, JPEG等。

Kappa工具运行在命令行。这意味着通过简单的批处理脚本,可以实现批处理功能。比如,以下Windows batch代码实现了两个目录下相同文件名的栅格文件的Kappa计算。计算结果保存在kappa.txt文件里。

@echo off
for %%i in (00 01 02 03 04 05 06 07 08 09 10 11 12 13 14 15 16 17 18 19 20 21 22 23) do (
echo Hour %%i …
kappa.exe data1rldas%%i data2rldas%%i  -k:.kappa.txt
)
echo Done.

命令行格式,Kappa.exe [参考或实测图像] [待比较图像] {-l:日志文件} {-k:Kappa文件}

[]表示必须,{}表示可选。对ESRI grid,图像指定到目录名;对个人geodatabase(通过Access数据库保存)的Raster dataset,以geodb.mdbraster指定;文件geodatabase的Raster dataset,以geodb.gdbraster指定。如果指定日志文件,在屏幕上输出的内容将同时保存到日志文件中;如果指定Kappa文件,则将Kappa系数单独保存在此文件中。此两选项开关在批处理有用。

运行需求

dotnet framework 2.0
ArcGIS desktop 9.2 with ArcView License or higher

运行平台

运行在Windows系统。但由于工具由C#编写,调用ArcGIS ArcObjects相关API,如果在Linux上有安装ArcGIS desktop 9.2,结合MONO runtime,本工具应当可以被编译成适合于Linux平台。

Binaries和source codes可以Email联系我。

Pm v2.25

一个俺用Qt写的用于记录你平时遇到的精彩英语句子的小软件。我感觉对于大家平时需要积累英语表达来撰写科技论文很有帮助,我一般在看英文文章时,这个小东西都是打开的,看到好的地道的表达方式就记录下来,等自己写的时候如果想不起来就查一下,反正我的经验是经常感觉类似句子表达以前在某地方看过但死活想不起来,这时候这东西就发挥作用了。没有批量导入功能,有朋友请求过,实现起来并不难,但我不想做,因为这小东西本来就是为了帮大家提高英语的,如果能强迫大家敲一遍那就起来作用了。不要向我请求什么功能,又不是商用了,我没有太多时间来改善这东西,功能够用就好。

请点击这里下载Pm v2.25安装文件

MD5 sum: f9d813cbf325c3eb93beb35f1335e1b3

完成了一个雷达数据到水文模型时间序列的转换程序包

这边的一个韩国同事前面写了一个Python版本的,在Linux下可以运行。我在Windows下对它进行了改进,并做了一些优化。结果在正式计算的时候,发现Ohio流域的一个子流域(2560个HRAP网格)10年逐小时估计要花上233天以上,同时需要空间也达100G以上。所以尽管该Python可用,但基本上对于大流域属于不实用的。为了完成工作,与梁讨论了以后,决定结合GIS和自己写代码,大概Coding了两周吧,现在终于完成了好几个小工具。在性能上进行了大量的优化(前一版本在转换到一半的时候出现内存不够,所以调试要花十分多的时间)。
我写了一个Instruction,大概从原始下载过来的XMRG二进制文件到可用的水文模型(如VIC)的时间序列大概要经过近10个步骤。不过实现了一个有意思的内插方法(与前Python算法相同),从HRAP网格到1/8度的转换时,由于每个1/8度网格覆盖多个HRAP格子,这个算法使用了面积加权来计算1/8度网格的平均降水。
现在完成上述任务大概需要2天。大家就可以在自己的桌面机器上用了,而不必一定要使用服务器(有大内存)。
没有时间做多线程或者并行优化,估计那样异步或并行处理性能会得到更好的提升。

GeneratePolygonsByPoints utility

Purpose: to generate polygons (rectangles) by connecting neighboring points

Author: Zhuotong Nan
Email: [email protected]
Date: Nov 21, 2007

ver: 1.0.0

Usage: GeneratePolygonsByPoints [data_file_name] {output shapefile name}
Rows*Cols (for ex, 260*250): (enter numbers of rows and cols for the source data file with
a format rows*cols. Incorrect input will stop the tool.)

data_file_name: source data file name; path can be included.
output shapefile name: optional, as its literal stated. path can be includes.

Supporting environment: Microsoft dotnet framework 2.0, ArcGIS 9.2 with dotnet assemblies, as
well as a valid ArcInfo license.

Remarks: Data file should be organized row by row (you should know exact row and column
number, which will be required to be entered after starting), starting from lower left corner.
In my initial case, the data file is generated by a modified Read_XMRG2 utility for XMRG
radar data file. The modified Read_XMRG2 will generate data with geographical coordinates
instead of HRAP coordinates as does original Read_XMRG2. Anyway, GeneratePolygonsByPoints
will also run against data file generated by original Read_XMRG2, however, with output
shapefile being in HRAP coordination.

Data file content looks like following:

-121.177570 37.897155 0.000000
-121.132468 37.907464 0.000000
-121.087345 37.917746 0.000000
-121.042201 37.928001 0.000000
-120.997037 37.938229 0.000000

The first column is longitude, second latitude, and the third precipitation value. The first
two columns represent that cells’ lower left coordinations. The first row indicates the lower
left cell; second is the next cell right to the first cell; after finishing a row, then begin
a row up the first row, and move upwards.

Output shapefile will be of geographic NAD83 datum. The first two columns will be converted
to points’ geographic location. Values (precp value in above example) will be lost. A new
field named "Index" will be generated to record this polygon’s lower left corner’s coordination
with a format of "lat_lon", for ex. 37.897155_-121.177570 for the first created cell. However,
you cannot depend on this field to link original source data file. In order to do link, you can
"ID" field in shapefile attribute table, which increases by one in consitence with source data
file.

As stated above, each cell is referred by its lower left corner’s coordination. The most upper
cells cannot be generated due to missing of necessary points (we only have lower edge’s
coord). Likewise, the most right cells are also missed.

The distribution also includes a test data file: xmrg0101199900z.out, with a 39*48 (rows*cols)
dimension.

For more information, please contact the author at [email protected].

完成了gimms-clip

作为了一个Qt的训练,主要是完成一个GIMMS数据集(ftp://ftp.glcf.umiacs.umd.edu/glcf/GIMMS/)的空间裁剪功能,特色在于:
  • Qt实现跨平台,国际化等功能
  • 调用GDAL完成多种GIS格式的转换
  • 可变线程来处理整个裁剪流程

完成了v1.0,可能暂时到止,以后有兴趣了,可以在此基础上再增加一些小功能,比如引进xml,将用户的配置记住等等(当然可以用QSettings,但锻炼一下学生的xml也是不错的)

放一个截图吧,已经本地化

——

前面有朋友问为什么在windows下不用mfc,我最早应该是mfc出身的,但接触的科研项目大多对操作平台有要求,国外很多学者仍是用linux/unix环境来进行科学研究,于是开始寻找一种可以跨平台的而且对于我来讲比较易学的工具(c/c++/c#背景),Qt当然是个不错的选择,只是Qt/win稍贵了一些

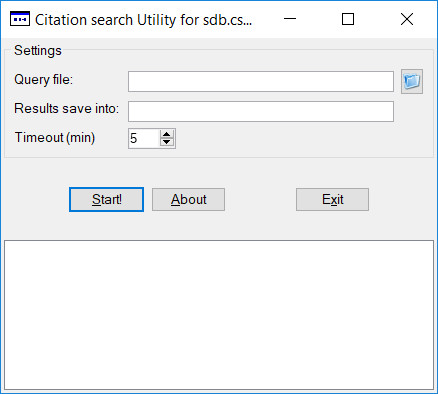
这两天写了个小玩意citationSearch v0.1

目的:
从http://sdb.csdl.ac.cn 输入文章标题和作者名,获取该文章的引用次数,以及所属
的单位名
这个小玩意初步实现了批处理的功能,比如手上有1万个文章标题和对应的作者,就可
以用这个很容易的得到引用次数等信息
技术:
Qt 4.1,
当前版本,v0.1,由于这两天 sdb.csdl.ac.cn网络有问题,所以完成界面后没有来得
及测试;几个重要类是2天前在console模式下测试通过。不过最主要的难点都已经解
决,其余的就是如何做的更好的事情了。
可以学到:
* 大量的使用了qt的signal/slot机制,这种机制对写的人很方便,但对阅读的人估计
就感觉比较乱了
* QHttp的异步机制,在http返回前,QHttp对象一定不能已经销毁
* 由于QHttp的异步机制,所以程序里 顺序的渠道是无法知道什么时候http返回信息,
这样对由几个页面组织在一起,即第二页面必须在第一页面完成后才能执行,第三个页
面,又只能在第二个页面完成后执行,必须也要通过signal来通知。即第一个页面完成
任务后,通知第二页面开始工作。
* 学到了一点新知识:一个对象发出了 signal,联结到一个对象的slot,这个slot如
果企图要删除发出signal的对象时,会出错。 这种情况在此程序里出现,即我给定一
对文章标题和作者,要求执行三个页面,得到引用次数,,在得到引用次数后,这个对
象发出signal,要求联系的slot,继续给出下一对标题和作者 ,重新开始;由于异步
机制,这个对象必须是以指针的形式给出(如果是局部变量,可能会在异步返回前,这
个对象已经销毁),所以 在重新new一个对象时,必须要删除前一个已经存在的该对
象,在slot里直接删除会出错,提示QMutex共享冲突。 试了很长时间,找到一个折衷
的解决方案:
即在重新new一个对象前,将前一个对象指针先保存起来,这样就是说 在当前的slot里
不去删除该对象,但在经过一次循环后,在下一次,可以将该对象指针完全删除,而不
引用异常。
描述的比较抽象,看一些示例代码:
entry point:

aQuery=new queryCitation(author, title, this);

aQuery->setTimeout(timeout);
connect(aQuery, SIGNAL(stopped(QString)), this,
      SLOT(saveResultsAndNextQuery(QString)));
aQuery->query();

saveResultsAndNextQuery(QString):

delete preQuery; //即在下一次调用里 删除上一次的instance
preQuery=aQuery;

aQuery=new queryCitation(author, title, this);
aQuery->setTimeout(timeout);
connect(aQuery, SIGNAL(stopped(QString)), this,
     SLOT(saveResultsAndNextQuery(QString)));
aQuery->query();

* 要形成post data,看源网页的代码,很费劲,这时可以用sniffer pro等来capture
这些post data
* 正则表达式的应用,用于抓取html文件里的需要的信息

下面给出page的基础类,供具备 post data功能的页面继承
web page页的abstract class 附下,

#pragma once
#include <QObject>
#include <QFile>
#include <QHttp>

class QTimer;

class page :
public QObject
{
    Q_OBJECT
public:
page(QString output_filename, int timeout=300);
virtual ~page(void);
virtual void PostData(); //提交数据
void setTimeOut(int secs);
public slots:
virtual void abort(); //强行取消,如超时
private:
virtual QString formatPostData()=0; //根据必要参数形成post数据,保存
                                             //在 postData里,返回值没经过url 编码
private slots:
virtual void on_postFinished(int id, bool error)=0;
/*
与QHttp.requestFinished相连
注意不要与 QHttp.done相连,Qhttp.done在
QHttp.abort或delete http时都会发生
*/
signals:
void done(bool error, QString msg); //http response 结束时发生, 无论
                                                  //有无错误
protected:
QByteArray postData;
QFile receivedHtml;
QHttp http;
QTimer* timer;
};

附界面截图

Citation Search v0.1
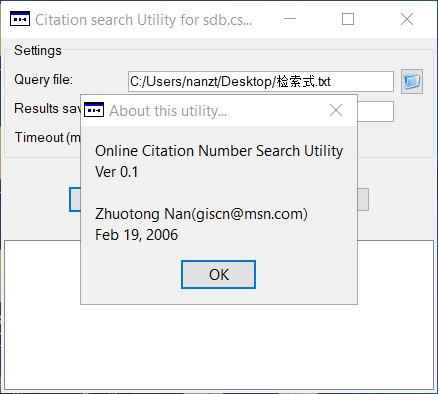
About screenshot

改进的图像校验码生成算法和辅助工具

*******************************************
目的
*******************************************
生成图像校验码

*******************************************    
内容           
                               

*******************************************
包括改进的asp图像检验码生成程序,和一个生成body.fix和head.fix的
辅助工具。该辅助工具基于Qt 4开发,基于GNU/GPL协议(请阅读GPL.txt
文档)。附源码。

*******************************************    
USAGE                                        

*******************************************
1. 制作0.bmp, 1.bmp等10张数字图片,并以0.bmp, 1.bmp这样的规律命名
2. 将图片放在images目录下
3. 运行tool.exe
4. 选定“生成Body.fix”,单击“运行”
5. 选定“生成head.fix”,指定检验码位数,宽度和高度是由上一步骤自动
读取得到,如果正确,保持不变。单击“运行”
6. 这时得到body.fix和head.fix,退出。
7. 用文本编辑器打开 valCode_new.asp,修改digit_width、digit_height、
digit_num 这三个参数,使之与以上步骤使用的参数一致
8. 将test.html, valCode_new.asp, body.fix, head.fix,以及blank.bin
五个文件复制到IIS虚拟目录下
9. 在浏览器里浏览test.html,就可以得到预想效果

NOTE: images目录下已经放了示例数字图片。注意每个图片大小必须严格一
致。将valCode_new.asp整合到某一web程序时,可以使用
Session("ValidationCode")对request值进行检验。

*******************************************
FILE LIST
*******************************************

blank.bin
body.fix      
head.fix      
images         <dir>
msvcp71.dll   
msvcr71.dll   
numCode.asp   
QtCore4.dll   
QtGui4.dll    
README        
src            <dir>
test.html     
tool.exe      
tool_zh.qm    
valCode_new.asp

images
0.bmp
1.bmp
2.bmp
3.bmp
4.bmp
5.bmp
6.bmp
7.bmp
8.bmp
9.bmp

src
GPL.txt
main.cpp
tool.cpp
tool.h 
tool.ico
tool.pri
tool.pro
tool.ui          

*******************************************    
CREDIT                                       

*******************************************
valCode_new.asp在BlueIdea.COM Web Team V37 2003-7-25工作的基础
改善完成(所附的numCode.asp是原文件)。
Qt是Trolltech的trademark。

Pm v2.23

仍没有帮助,有时间的朋友可以帮我写,我目前是补不上了,没有时间
也没有中文界面,既然是帮助大家学英语的,界面上的这点英语不算什么大问题吧,
如果有英语错误请帮我指出来
 
v2.2.3 [Sep-08-05]
# fixed typing a dir path in destination dir of pm tools will activate the Apply button when selecting either the backup or the restore option.
+ new Phrase Memo v2 toolkit, functioning with rebuild, back up and restore backed databases.
 
v2.2.2 [Aug-26-05]
# recompiled QtGui4.dll, to fix a popup menu bug which make menu cannot show on the taskbar.
+ singleton support.
+ double clicking the tray icon will bring up the window.
+ added system tray support. Now minimizing behavior will cause the windows hidden into system tray.
* rearrange the context menu of text edit.
# fixed when reverse selecting an underlined text then move the cursor to unformated text, the underline button will not changed simultaneously.
# fixed the cursor still keeps visible changed to read only mode.
* the cursor keep in the same position on save
 
下载请到 http://503.mygis.org,进去后,进入tags/rls-mmdd/,mmdd表示build的日期,选择离现在最近的日期,进入该目录,请下载 *_setup.exe。如果需要验证其合法性,请下载*_setup_md5.txt,内含该可执行文件的md5 hash码。你如果认为你的朋友也能用,just feel free to distribute it.
用户密码按已知的来,没有的请给我写信 giscn_at_msn[dot]com